
Jellyfin, install and configure this media server on Ubuntu
Install Jellyfin on Ubuntu
Jellyfin is compatible with GNU / Linux, Mac OS and Windows. For this example we are going to install it on an Ubuntu 18.04 LTS distribution.
To begin we are going to open a terminal (Ctrl + Alt + T) and install HTTPS transport for APT, if it is not already installed on your computer:
sudo apt install curl gnupg software-properties-common -y
sudo add-apt-repository universe -ysudo mkdir -p /etc/apt/keyringscurl -fsSL https://repo.jellyfin.org/jellyfin_team.gpg.key | sudo gpg --dearmor -o /etc/apt/keyrings/jellyfin.gpg
export VERSION_OS="$( awk -F'=' '/^ID=/{ print $NF }' /etc/os-release )"
export VERSION_CODENAME="$( awk -F'=' '/^VERSION_CODENAME=/{ print $NF }' /etc/os-release )"
export DPKG_ARCHITECTURE="$( dpkg --print-architecture )"
cat <<EOF | sudo tee /etc/apt/sources.list.d/jellyfin.sources
Types: deb
URIs: https://repo.jellyfin.org/${VERSION_OS}
Suites: ${VERSION_CODENAME}
Components: main
Architectures: ${DPKG_ARCHITECTURE}
Signed-By: /etc/apt/keyrings/jellyfin.gpg
EOF
sudo apt update && sudo apt upgradesudo apt install jellyfin -y
Start the Jellyfin service
To withdraw from your enable and start the service after each restart we will execute the following commands:

sudo systemctl enable jellyfinsudo systemctl start jellyfin
We can check if the service has been started correctly or not by running the command:
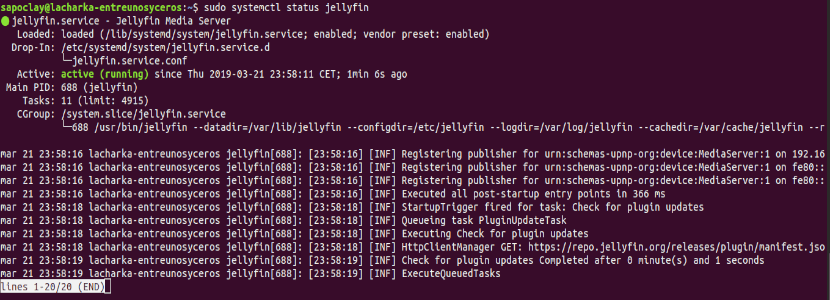
sudo systemctl status jellyfin
If you see an output like the one in the previous screenshot, Jellyfin will have started the service correctly. At this point, we can move on to the initial setup.
upgrade jellyfin
sudo apt update -ysudo apt --only-upgrade install jellyfin
edit jellyfin
1/ chaneg logo in login session-login-index-html.xxxxxxxxxx.chunk.js
find <div class=”padded-left padded-right padded-bottom-page margin-auto-y”>
add after <img src=”/web/assets/img/banner-light.png” width=188px style=”padding: 0px;display:block; margin-left: auto; margin-right: auto;”>
2/
Initial setup
We will be able to access Jellyfin from any system on the network. It will not be necessary to install any extra applications. All you need is a web browser modern. To begin, we are going to make the configuration, start by accessing the URL in the browser http://nombredominio:8096 o http://dirección-IP:8096.
Install rclone mount disk media form onedrive
curl https://rclone.org/install.sh | sudo bash
rclone config
Step by step
n > Microsoft onedrive > blank > blank > microsoft cloud global > n > n
authen with vps no gui, download rclone.exe and run
> rclone authorize “onedrive” > copy and paste token
> Onedrive personal or business > one drive business > blank > y > q
/etc/jellyfin/
/usr/share/jellyfin/
create folder follow /mnt/rclone/
mount cloud
rclone –vfs-cache-mode writes mount “OneDrive”: /mnt/rclone/
tạo file trong /etc/systemd/system/rclone.service
hoặc /lib/systemd/system/ (với ubuntu 22.04)
[Unit] Description=Onedrive (rclone)
AssertPathIsDirectory=/mnt/rclone/Onedrive
Wants=network-online.target
After=network-online.target [Service] Type=simple
ExecStart=/usr/bin/rclone mount \
–allow-other \
–cache-dir=/tmp/rclone/vfs \
–no-modtime \
–stats=0 \
–bwlimit=30M \
–dir-cache-time=5m \
–vfs-cache-mode full \
–vfs-cache-max-size 1G \
–buffer-size 0 \
–user-agent “ISV|rclone.org|rclone/v1.62.2” \
–tpslimit 2 \
–cache-info-age=15m Onedrive:/ /mnt/rclone/Onedrive
ExecStop=/bin/fusermount -u /mnt/rclone/Onedrive
Restart=always
RestartSec=10 [Install] WantedBy=multi-user.target
apt update && apt install fuse3 s3fs
hoặc
ln -s /bin/fusermount /bin/fusermount3
fusermount -u <mountpoint> with my vps fusermount -u Onedrive to unmount it correctly. If it says its busy, force it by umount -l <mountpoint> and then using the fusermount command again.Save it and execute it by running systemctl start rclonemount. You can view if it failed or not by running systemctl status rclonemount. To make it execute on next boot, execute systemctl enable rclonemount and it should run on the next reboot.
If you do any changes to rclonemount.service, make sure to execute systemctl daemon-reload to reload any changes you’re done.
Taking a Backup
- Stop the running Jellyfin server. This is extremely important, as otherwise the database will be locked and might not be recoverable when restoring. Note that this will interrupt any playback.
- Any platform: Within the Jellyfin Dashboard, click “Shutdown”. This should cleanly stop the process on all platforms, but if not, try one of the following.
- Docker:
docker stop jellyfin - Debian/Ubuntu packages:
sudo systemctl stop jellyfinorsudo service jellyfin stop - Windows Installer: Right-click the Tray app, and select “Quit”; or, in Process Manager, find the Jellyfin process and terminate it.
- MacOS Installer (.dmg): In Activity Monitor, find the Jellyfin process and terminate it.
- Portable Installs (regardless of platform): Stop the running
jellyfinorjellyfin.exeprogram, however it was started.
- Copy your data and configuration directories to a destination of your choice. What you name the copies is up to you; personally, I like to use dated and versioned directory names e.g.
jellyfin.2024-05-01_10.8.13. Where these files are also depends on the platform; generally these follow the XDG Directory Specification for platforms that support it. For more information see the configuration documentation.NOTE: These are default locations; if you’ve changed your data or config paths, use those instead.- Official Docker: Wherever your
/dataand/configvolumes are sourced from; this is set in yourdocker-compose.ymlor in your-voptions todocker run. - LinuxServer.io Docker: Data and config are wherever your
/configvolume is sourced from; this is set in yourdocker-compose.ymlor in your-voptions todocker run. - Debian/Ubuntu packages: Data is in
/var/lib/jellyfinand config is in/etc/jellyfin; these are defined in/etc/default/jellyfin. - RPMFusion Fedora/CentOS packages: Data is in
/var/lib/jellyfinand config is in/etc/jellyfin; these are defined in/etc/sysconfig/jellyfin. - Windows Tray/Installer (.exe): Data and config is in
%PROGRAMDATA%\Jellyfin\Server(C:\ProgramData\Jellyfin\Server) or%LOCALAPPDATA%\Jellyfin(C:\Users\<Username>\AppData\Local\Jellyfin). - MacOS Installer (.dmg): Data is stored in one of these paths; back up whichever one(s) exist:
~/.config/jellyfin/,~/.local/share/jellyfin/,~/Library/Application Support/Jellyfin/. - Portable Installs:
- Linux: Data is stored in
~/.local/share/jellyfinand config in~/.local/share/jellyfin. - Windows: Data and config is in
C:\Users\<Username>\AppData\Local\Jellyfin, using%LOCALAPPDATA%. - MacOS: Data is stored in these paths; back up whichever one(s) exist:
~/.config/jellyfin/,~/.local/share/jellyfin/,~/Library/Application Support/Jellyfin/.
- Linux: Data is stored in
As an example, on Debian, you can do this with these commands to make a copy of both directories into a single target directory:
- Official Docker: Wherever your
TIMESTAMP=$(date +%Y%m%d%H%M%S)
VERSION=10.9.10
sudo mkdir -p /media/backups/jellyfin.${TIMESTAMP}_${VERSION} # Or change the path wherever in your system makes sense to you
sudo cp -a /var/lib/jellyfin /media/backups/jellyfin.${TIMESTAMP}_${VERSION}/data
sudo cp -a /etc/jellyfin /media/backups/jellyfin.${TIMESTAMP}_${VERSION}/config
3./Start up Jellyfin again, either after upgrading or on the current version. You now have a safe copy of your data in the path chosen in step 2.
Restoring a Backup
This process assumes you followed the steps above to take the backup.
- Stop the running Jellyfin server process.
- Move your current data and configuration directories out of the way (e.g. by appending
.bakto them). For example,sudo mv /var/lib/jellyfin /var/lib/jellyfin.bakandsudo mv /etc/jellyfin /etc/jellyfin.bak. - Copy – do not move or rename – your backup to the existing name. For example,
sudo cp -a /media/backups/jellyfin.2024-10-27_10.9.11/data /var/lib/jellyfinandsudo cp -a /media/backups/jellyfin.2024-10-27_10.9.11/config /etc/jellyfin. - If required, downgrade Jellyfin to the same version as your backup now.
- Start up Jellyfin again. It should start cleanly with the old data, assuming versions are correct. If you downgraded this may happen automatically.
Install Jellyfin on Docker UI
compose.yaml
services:
jellyfin_H4Mm:
image: jellyfin/jellyfin:${VERSION}
# container_name: ${CONTAINER_NAME}
deploy:
resources:
limits:
cpus: ${CPUS}
memory: ${MEMORY_LIMIT}
restart: always
ports:
– ${HOST_IP}:${WEB_HTTP_PORT}:8096
volumes:
– ${APP_PATH}/config:/config
– ${APP_PATH}/cache:/cache
– /mnt/rclone/Onedrive/LOSSLESS:/media/media
labels:
createdBy: “bt_apps”
networks:
– baota_netnetworks:
baota_net:
external: true
.env
VERSION=latest
CONTAINER_NAME=CONTAINER_NAME
HOST_IP=0.0.0.0
WEB_HTTP_PORT=8096
CPUS=0
MEMORY_LIMIT=0MB
APP_PATH=/www/dk_project/dk_app/jellyfin/jellyfin_H4Mm
….
CSS config
https://github.com/BobHasNoSoul/jellyfin-mods
/*remove logo*/
.pageTitleWithLogo {
width: 0 !important;
}/*color background*/
.backgroundContainer.withBackdrop,
.backdropContainer,
.backgroundContainer {
background: #000720cc;
}/*remove favourite*/
.material-icons.favorite:before {
display: none !important;
}
.btnUserRating{display:none;} button[is=”emby-ratingbutton”]{display:none;} .noHomeButtonHeader button[data-index=”1″]{display:none;} button[data-index=”3″]{display:none;}
/*If the logo is present on the details page of an item, hide the items’ title*/
#itemDetailPage .itemName.infoText.parentNameLast > bdi:nth-child(1) {display: none;}
.hide+.detailPageWrapperContainer .itemName > bdi:nth-child(1) {display: block !important;}/*Do the same for the single episodes link back title*/
#itemDetailPage .parentName > bdi:nth-child(1) {display: none;}
.hide+.parentName > bdi:nth-child(1) {display: block !important;}/*Hide the top bar when the login page is visible*/
body:has(#loginPage:not(.hide)) .skinHeader {
display: none !important;
}/*Show the top bar when the login page is hidden or absent*/
body:not(:has(#loginPage:not(.hide))) .skinHeader {
display: flex !important;
}
Plugin
https://raw.githubusercontent.com/bvolvy/CustomLogoPlugin/main/manifest.json
https://raw.githubusercontent.com/danieladov/JellyfinPluginManifest/master/manifest.json
https://raw.githubusercontent.com/n00bcodr/jellyfin-plugins/main/10.11/manifest.json
for movie
https://www.iamparadox.dev/jellyfin/plugins/manifest.json
https://github.com/MakD/zombie-release